Image Map

Facebook Pinterest Twitter Instagram Email Family Home Crafty Recipes Goals Blog Roll PR
Showing posts with label Photography. Show all posts

Sunday, May 6, 2012

Embrace the Camera Flash

Since getting my DSLR, I've been avoiding using the flash. I figure its better to learn about natural and off camera light anyway. Plus, when I used it, all of my pictures looked like this.


Washed out with lots of ugly shadows in the background. Not the look I expected from an $800 camera and even editing won't fix what the flash does to the image. The reason the pictures look this way is because the light is coming right at the subject causing shadows behind them and often red eye. Sad day.
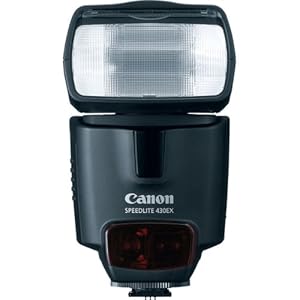
The trick is to create a bright light that fills the area and coats the subject evenly. If you've got a few hundred dollars to invest, getting a Speedlite is the way to go. It sits in the camera's hot shoe (the little slot on top of the flash) and bounces light off the ceiling, walls, or through a diffuser. The light on top is adjustable in both flash power and position. Basically, its awesome.

Now, if you don't have a few hundred dollars, like me for instance, you may be feeling at odds with your flash. Have no fear! There is a much cheaper solution!

While it doesn't completely replace the glory that is a Speedlite (or other off camera flash), for around $30, a light scoop can mimic the bounced light look. I bought this one a few months ago, but only really started using it recently. Here are some pictures I took with the light scoop on.


Huge difference right? Same room, same subject, same ambient lighting. The only thing I did differently was to attach the light scoop - which is incredibly easy. The scoop has a mirror that bounces the flash up onto the ceiling and back down onto the subject. Like this -
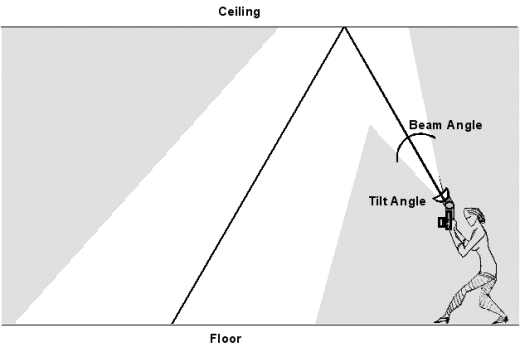

It floods the room with light, rather than shooting it directly at you. The ideal situation is in a room with lower, white ceilings since colored ceilings will bounce light with a slight hue and higher ceilings won't bounce the flash as well. Another down fall is that it doesn't work if you shoot vertically since the bounce then goes off to the side, but I don't mind.

One day I'll get a Speedlite, but for now, this does a great job.

Wednesday, April 18, 2012

Two Peas Week Two - ISO & Shutter Speed

This week's lesson from Two Peas in a Bucket is about ISO and shutter speed. I haven't spent much time shooting in Tv (shutter priority mode) since Av (aperture priority mode) was so easy to understand. Turns out, playing with shutter speed is fun! For this week's homework, I had to capture water with various ISOs (film speed) and shutter speeds.

f/5.6    1/80    ISO 1600
A fairly standard exposure like you'd use taking an everyday shot indoors.

 f/1.8    1/1250    ISO 1600
A much faster speed to freeze the water as it bubbles and spills.

 f/14    1"    ISO 100
A much slower shutter speed (a full second) creates a smooth, blurred water look.

  f/1.8    1/1250    ISO 1600
A better example of "frozen" water spilling.

This week's lesson had a lot of good information about taking photos both inside and outdoors and how adjusting the film and shutter speed can help get well lit, clear shots. Hopefully, knowing more about shutter and film speed will help me get better indoor shots of my wiggly toddler!

Check back for next week's lesson on lighting, which is good because...lighting is hard.

Wednesday, April 11, 2012

Two Peas Week One - Aperture

Week one of the Two Peas in a Bucket photography course is about aperture. Since getting my 50mm lens, I've been playing around in Av mode a lot and really love changing the depth of field to change the picture. Here is my "homework" from this week's lesson.

 
f/1.8 (left)         f/3 (right)

 f/11 (left)         f/22 (right)

I should have grabbed my tripod to take these, but truth be told, I was feeding a toddler at the same time and used the flower as my subject because it was on the kitchen table. I think I have a pretty good grasp on aperture; its keeping the lighting correct as you increase the f stop that gets me. As you can see, the bottom pictures get more yellow because of the aperture closing and letting in less light. I'll figure it out eventually. Hopefully.

Next week's lesson is ISO and shutter speed. Stay tuned!

Thursday, April 5, 2012

Two Peas in a Bucket

Since getting my DSLR last summer, I've been tinkering around with it and learning as I go. Though I consider it a personal accomplishment to have never shot a single picture in auto, one of my goals for this year is to buckle down and take an online course to learn the ins and outs of my camera before getting into bad habits or guessing at using features.

Fortunately, there is a free online "course" that you can read through and learn features and practice various techniques from Two Peas in a Bucket.

The course goes over: 


Week 1: Aperture Basic Training
Week 2: Advanced Aperture
Week 3: Light
Week 4: Flash
Week 5: Composition & Framing
Week 6: Shooting Indoors
Week 7: Shooting Outdoors
Week 8: On the Go
Week 9: Portraits
Week 10: Landscapes
Week 11: Your Daily Environment
Week 12: Lenses, Filters & Accessories

You can find the links to each of the courses here.

Each week comes with homework and things to try out. I'm going to be participating in the course on a photography message board over the next few months and will also post my "homework" here! Hopefully, I can learn more about what my camera can do because I am absolutely certain that I haven't gotten the hang of it all just yet. 

In the meantime, I'm going to keep practicing and pinning fun tutorials and photo ideas on my Pinterest "I want to be good at photography" board. If you're interested in taking the Two Peas course with me, let me know! We can do a weekly check in and show and tell!

And while we're talking about pictures, I leave you with another J & C favorite. :-) Something about pictures of them makes me want to make them black and white...

Wednesday, June 15, 2011

Um, Photography is Hard

I have an entirely new appreciation for those who take beautiful pictures - it is a lot harder than it looks. I've always had a point and shoot camera, but after seeing gorgeous pictures on friend's blogs and facebook profiles, I decided I wanted to try my hand at photography with a digital SLR. Luckily, my brother was nice enough to lend me his Canon Rebel xTi to get a feel for it before I dropped several hundred dollars into my own.

It took me 30 minutes to figure out how to change the f stop and another two days to figure out what the f stop actually does. ::facepalm::

I promise I'm not a totally helpless case. After playing around with the settings and trying different things, I think I'm getting the hang of it. I've found a few tutorials, manuals, and online courses that seem to be helping as well. I have no delusions of becoming an award winning photographer - I just want to take nice pictures of my kid that aren't blurry as hell.

I took the camera with us to camp this weekend and was able to test it out a little in the natural light.

Pictures from around camp...


 Yay for playing with field of focus...


 And this is what happens when you figure out the white balance...


 Other random pictures...


It was a lot of fun trying to figure things out. I still need A LOT of work - especially on lighting and figuring out the manual settings. It'll come with time. In the meantime....don't make fun of my crappy pictures. :-P

Monday, November 29, 2010

Mommy Has a New Camera!

Thanks to some snazzy 5am Black Friday shopping, I finally have a camera to take good pictures of Charlie! My last camera was okay, but the flash was completely over powering and made taking pictures of him nearly impossible. I would either blind him with the flash or the picture would be blurry without it. Anyway, today we had a little photo shoot and I really like how they turned out!


I foresee taking thousands of pictures of this cute little boy. He's just too cute!